-
Table of Contents
“Efficiently insulate your attic with DIY blown-in cellulose insulation for a cozy and energy-efficient home.”
Introduction
DIY blown in cellulose attic insulation is a popular and cost-effective method for insulating attics. It involves using a machine to blow loose cellulose fibers into the attic space, creating a thick layer of insulation that helps to keep the home warm in the winter and cool in the summer. This type of insulation is easy to install and can provide significant energy savings for homeowners. In this introduction, we will explore the benefits, process, and considerations for DIY blown in cellulose attic insulation.
The Benefits of DIY Blown-In Cellulose Attic Insulation
Attic insulation is an essential component of any home’s energy efficiency. It helps to regulate the temperature inside the house, keeping it warm in the winter and cool in the summer. However, many homeowners overlook the importance of proper attic insulation, leading to higher energy bills and discomfort in their living spaces. While there are various types of attic insulation available, one option that has gained popularity in recent years is DIY blown-in cellulose attic insulation.
DIY blown-in cellulose attic insulation is a type of loose-fill insulation that is made from recycled paper and treated with fire-retardant chemicals. It is an eco-friendly and cost-effective alternative to traditional fiberglass insulation. This type of insulation is installed by blowing it into the attic space using a special machine, making it a relatively easy and quick DIY project for homeowners.
One of the main benefits of DIY blown-in cellulose attic insulation is its high R-value. R-value is a measure of an insulation material’s ability to resist heat flow, and the higher the R-value, the better the insulation. Cellulose insulation has an R-value of 3.2 to 3.8 per inch, which is higher than fiberglass insulation’s R-value of 2.2 to 2.7 per inch. This means that cellulose insulation provides better thermal resistance, making it more effective in keeping your home comfortable and reducing energy costs.
Another advantage of DIY blown-in cellulose attic insulation is its ability to fill small gaps and crevices in the attic space. Unlike fiberglass batts, which can leave gaps and spaces between the insulation and the attic floor, blown-in cellulose insulation can be evenly distributed, providing better coverage and reducing the chances of air leakage. This also makes it a more effective sound barrier, reducing noise from outside sources.
DIY blown-in cellulose attic insulation is also a more environmentally friendly option compared to other types of insulation. As mentioned earlier, it is made from recycled paper, making it a sustainable choice for homeowners who are conscious of their environmental impact. Additionally, cellulose insulation is treated with borate, a natural mineral that acts as a fire retardant and also repels pests such as rodents and insects. This eliminates the need for harsh chemicals, making it a safer and healthier option for your home.
One of the most significant benefits of DIY blown-in cellulose attic insulation is its cost-effectiveness. It is relatively inexpensive compared to other types of insulation, making it an attractive option for homeowners on a budget. Additionally, since it can be installed by homeowners themselves, it eliminates the need for hiring professional installers, further reducing the overall cost of the project.
Moreover, DIY blown-in cellulose attic insulation has a longer lifespan compared to other types of insulation. It does not settle or compress over time, ensuring that your home remains adequately insulated for many years. This means that you won’t have to worry about replacing or adding more insulation in the future, saving you time and money in the long run.
In conclusion, DIY blown-in cellulose attic insulation offers numerous benefits for homeowners looking to improve their home’s energy efficiency. Its high R-value, ability to fill small gaps, eco-friendliness, cost-effectiveness, and long lifespan make it a top choice for many. With its easy installation process, it is a DIY project that any homeowner can tackle, providing a comfortable and energy-efficient living space for years to come.
How to Save Money with Foam Blown Insulation for Your Attic
Attic insulation is an essential component of any home, as it helps to regulate the temperature and keep energy costs down. However, traditional insulation methods can be costly and time-consuming. This is where DIY blown-in cellulose attic insulation comes in. Not only is it a cost-effective option, but it is also relatively easy to install. In this article, we will discuss the benefits of using foam blown insulation for your attic and provide a step-by-step guide on how to install it yourself.
First and foremost, let’s talk about the cost savings. Traditional insulation methods, such as fiberglass batts, can be expensive, especially if you have a large attic space. On the other hand, blown-in cellulose insulation is much more affordable, making it a popular choice for homeowners looking to save money. Additionally, since it is a DIY project, you won’t have to pay for labor costs, further reducing the overall cost.
Aside from the cost savings, blown-in cellulose insulation also offers superior insulation properties. It is made from recycled paper and treated with fire-retardant chemicals, making it an eco-friendly option. The cellulose fibers are densely packed, creating a barrier that effectively blocks heat transfer. This means that your home will stay cooler in the summer and warmer in the winter, reducing your energy bills.
Now that we’ve established the benefits of using blown-in cellulose insulation, let’s dive into the installation process. The first step is to gather all the necessary materials. You will need a blower machine, cellulose insulation, a ladder, a utility knife, and a staple gun. You can rent a blower machine from your local hardware store, and the cellulose insulation can be purchased in bags.
Next, you will need to prepare your attic for the installation. Start by clearing out any debris or objects that may be in the way. You will also need to seal any air leaks, such as gaps around pipes or vents, to ensure that the insulation is effective. Once the attic is prepped, it’s time to start blowing in the cellulose insulation.
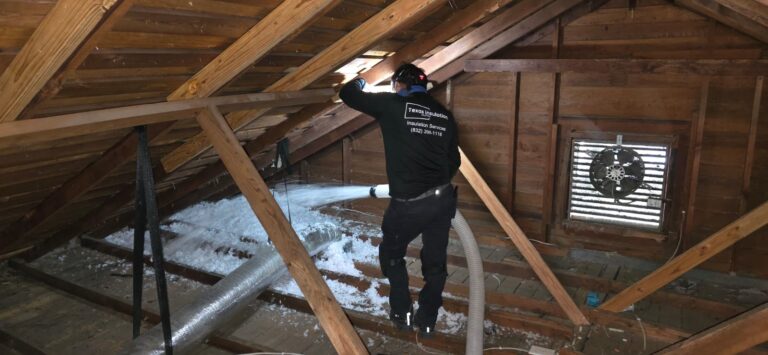
Using the blower machine, start at the far end of the attic and work your way towards the entrance. Make sure to wear protective gear, such as a mask and goggles, as the insulation can be dusty. As you blow in the insulation, use a rake or broom to spread it evenly and avoid any clumps. You will also need to use a staple gun to secure the insulation to the attic floor, preventing it from shifting.
Once the entire attic is covered with a layer of insulation, you can add a second layer for maximum effectiveness. This step is optional, but it will provide additional insulation and help fill in any gaps. Make sure to use the same technique of spreading and stapling the insulation.
After you have completed the installation, it’s essential to clean up any excess insulation and seal the entrance to the attic. You can use a utility knife to trim any excess insulation and seal the entrance with a piece of plywood or drywall.
In conclusion, DIY blown-in cellulose attic insulation is a cost-effective and efficient way to insulate your home. Not only will it save you money on energy bills, but it is also an eco-friendly option. With the right materials and a bit of effort, you can easily install it yourself and enjoy the benefits of a well-insulated home. So why wait? Start saving money and improving your home’s energy efficiency with foam blown insulation for your attic.
Step-by-Step Guide to Installing Blown-In Cellulose Insulation in Your Attic
Installing insulation in your attic is a crucial step in maintaining a comfortable and energy-efficient home. It helps to keep your home warm in the winter and cool in the summer, while also reducing your energy bills. One popular and cost-effective option for attic insulation is blown-in cellulose insulation. This type of insulation is made from recycled paper and is known for its ability to fill in small gaps and crevices, providing excellent coverage and reducing air leakage. In this step-by-step guide, we will walk you through the process of installing blown-in cellulose insulation in your attic.
Step 1: Gather Materials and Tools
Before you begin the installation process, it is essential to gather all the necessary materials and tools. You will need a blower machine, cellulose insulation, a ladder, a utility knife, a staple gun, and a respirator mask. It is also recommended to wear protective clothing, such as long sleeves and gloves, to avoid any irritation from the insulation.
Step 2: Prepare the Attic
The first step in installing blown-in cellulose insulation is to prepare your attic. Start by clearing out any debris or objects that may be in the way. You will also need to seal any air leaks, such as gaps around pipes or vents, to ensure that the insulation does not escape. Additionally, make sure to cover any recessed lights or electrical fixtures with a protective cover to prevent them from coming into contact with the insulation.
Step 3: Load the Blower Machine
Next, you will need to load the blower machine with the cellulose insulation. Follow the manufacturer’s instructions for loading the machine properly. It is essential to wear a respirator mask during this step to avoid inhaling any dust particles.
Step 4: Start Blowing the Insulation
Once the machine is loaded, you can start blowing the insulation into your attic. Begin at the farthest corner of the attic and work your way towards the attic access. Use the blower machine to distribute the insulation evenly, making sure to cover all areas of the attic. It is crucial to maintain a consistent depth of insulation throughout the attic to ensure maximum effectiveness.
Step 5: Fill in Small Gaps and Crevices
As you are blowing the insulation, make sure to fill in any small gaps and crevices that may be present. These areas are often overlooked but can significantly impact the overall effectiveness of the insulation. Use a utility knife to cut the insulation into smaller pieces and fill in these gaps by hand.
Step 6: Staple Insulation Baffles
Insulation baffles are essential for maintaining proper ventilation in your attic. They help to prevent the insulation from blocking the airflow from your soffit vents. Once the insulation is blown in, staple insulation baffles in place along the eaves of the attic.
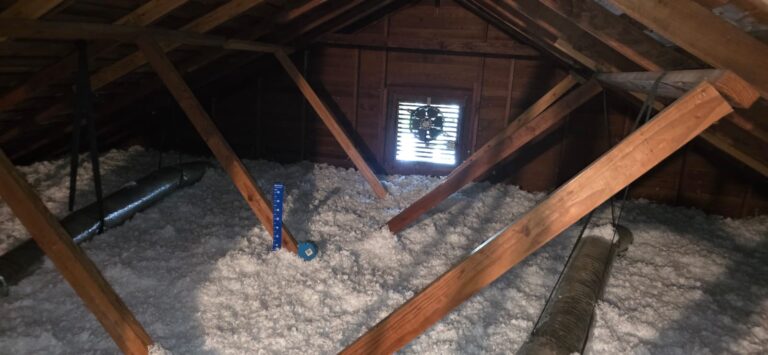
Step 7: Check for Adequate Coverage
After you have finished blowing in the insulation, it is crucial to check for adequate coverage. The recommended depth for blown-in cellulose insulation is between 10-14 inches. Use a ruler or measuring tape to ensure that the insulation is evenly distributed and meets the recommended depth.
Step 8: Clean Up and Dispose of Excess Insulation
Once you have completed the installation, it is time to clean up and dispose of any excess insulation. Use a broom or vacuum to clean up any insulation that may have fallen onto the floor or other surfaces. Dispose of any excess insulation according to your local regulations.
In conclusion, installing blown-in cellulose insulation in your attic is a relatively simple and cost-effective way to improve the energy efficiency of your home. By following these step-by-step instructions, you can ensure that your attic is properly insulated, providing you with a comfortable and energy-efficient living space. Remember to always wear protective gear and follow safety precautions when working with insulation. With proper installation, blown-in cellulose insulation can provide long-lasting benefits for your home.
Q&A
Q: What is blown in cellulose attic insulation?
A: Blown in cellulose attic insulation is a type of insulation made from recycled paper fibers that is blown into the attic space using a special machine.
Q: How is blown in cellulose attic insulation installed?
A: Blown in cellulose attic insulation is installed by using a machine to blow the insulation into the attic space, filling in any gaps or voids.
Q: What are the benefits of using blown in cellulose attic insulation?
A: Some benefits of using blown in cellulose attic insulation include improved energy efficiency, better soundproofing, and resistance to mold and pests. It is also a more environmentally friendly option as it is made from recycled materials.
Conclusion
In conclusion, DIY blown-in cellulose attic insulation is a cost-effective and efficient way to improve the energy efficiency of a home. It can help reduce heating and cooling costs, improve indoor air quality, and provide better soundproofing. However, it is important to follow proper safety precautions and installation techniques to ensure the insulation is effective and long-lasting. Overall, blown-in cellulose insulation is a great option for homeowners looking to improve their attic’s insulation.